
article.md 32 KB
HOW TO PREPARE A GENERIC SCIENTIFIC MANUSCRIPT FOR SUBMISSION USING MARKDOWN AND PANDOC
First A. Author^1^, Second B. Author^2^, Third Author^3^, Last Author^1,2,3^
- University of Pandoc, Randwick, NSW, Australia
- Markdown Institute, Ottawa, ON, Canada
- LaTeX Research Institute, Kingston, On, Canada
\
Corresponding author \ Dr. First A. Author \ University of Pandoc \ 42 Printers Lane \ 2031, Randwick, NSW, Australia \ email: fa.author@pandoc.au \ ph: +61-1-2345-6789 \ \ \ Keywords: Pandoc, Markdown, Latex \ Running title: Markdown manuscript \ Wordcount: 4,321
\newpage
Abstract
Purpose. If journal requires abstract sections, these can be included and made bold by including double asterisks **section_name** before and after each header. If these are not needed, simply do not include them, simple.
Methods. Because of our selected font, we can easily include special characters directly into our markdown file and these will be rendered properly. This provides some motivation to find a text editor that has a good character map plugin. Personally, I have grown rather fond of the Atom editor, which has a character-map plugin that does the trick. by clicking on a hotkey, Alt-l, I can type the name of the symbol I am looking and it is inserted into my document.
Results. So lets say I just pressed Alt-l and typed plusminus. The item at the top of the list would be ±, as expected. I hit Enter and it is inserted into my document. This makes it easy to say that, on average, my level of frustration drafting a manuscript has decreased by 77% ± 4% since learning about Markdown and Pandoc. Also, scientific papers always sound fancier when you use Greek letters. So I will search for the letter beta, which gives me the special character β. Also, because Pandoc converts Markdown to PDF using LaTeX, it is amazing support for mathematical equations and the like. Most basic tutorials on LaTeX should cover the basics of math-mode (i.e. $math stuff$).
Conclusion. This dummy manuscript and its accompanying files includes everything you need to generate a basic manuscript for submission. The rest of this paper will provide a brief overview of Markdown, Pandoc and the various parts that accompany this manuscript to generate the final result. I chose a simple approach and targeted generic formatting. Much more sophisticated manuscripts can be generated, but it is always a good idea to start small and simple.
\newpage
Introduction
A guiding principle of Pandoc and LaTeX is to separate content from style. While this can be achieved in LaTeX, the actual document in which you write can be rather intimidating for the uninitated. It is filled with commands, for example \usepackage[margin=3cm]{geometry}, and typing even a simple document can become cluttered with function calls to make text bold (\textbf{my text}) or italic (\emph{my text}), or just trying to write a percent sign (\%). While LaTeX is more powerful and is what is used by many publishers to typeset the journals we publish, it can be overwhelming for people who have any used Microsoft Office or Libre Office.
Markdown is a simple markup language initially created to write content for the web. Pandoc, on the other hand, is a powerful Swiss Army knife of a tool that converts documents from one format to another. Importantly, Pandoc adds functionality that allows us, researchers and scientists, to generate professional looking manuscripts. And yes, Pandoc handles references and citations in a clean and efficient way; more on this later.
This means that we can now focus on the content of our manuscripts when we are writing them. We will let Pandoc do the heavy lifting of creating a professional looking manuscript that we can share with co-authors and submit for review. And since we are using Markdown to write our manuscript, we can use a simple text editor, and the text that we write will be quite straight forward, free of LaTeX-style function calls.
While we may use various formatting styles when writing notes, reports, letters, etc., things are rather straightforward when preparing scientific manuscripts [^1]. The main types of inline formatting I use are italics, super- and subscript. I also include tables and figures, and very occasionally use footnotes. For the footnote I just used, I typed [^1] in the spot where I want the superscript number 1 to appear, and then, somewhere else in the document (I chose immediately after the paragraph as this makes it easy to find if I need to change it) add [^1]: At least for the type of papers I find myself writing. This text has to be on its own line, with an empty line before and after. To make something italic, simply add an asterisks on either side. For example, typing this, *this will be slanted* will result it text that appears as this will be slanted. Superscript is achieved by surrounding the text with the carat symbol. For example, sum^adults^ will generate sum^adults^. Similarly, the tilda symbol is used for subscript: sum~chilren~ will appear as sum~children~ in the final document. We will cover tables and figures later in this document. The key thing here is that making these style changes can be done later, en masse. If you don't remember how to make something italic, bold or superscript, don't worry. Just leave yourself a note [TODO: make this text bold] and keep your writing flow going. Remember, we are trying to separate content from style. Stay in the flow and don't get distracted. I have included a brief review of key inline formatting (Table 1) and special characters (Table 2) at the end of this paper.
[^1]: At least for the type of papers I find myself writing.
Methods
It turns out we need to add and specify a few things to Pandoc in order to obtain a presentable manuscript. As you can see, these details are not included in this file, the manuscript.md file. That is because we are trying to separate content from style (and distractions). So this file is where we should write our manuscript. The details that specify things like the font, whether or not we want numbered sections, the addition of line numbers, etc are in small helpers files. Lets go over these now.
Participants
To generate the PDF output, we simply need to run pandoc -d header.yaml on the command line. The content of this file could be placed in a yaml header at the top of this document, but that would be distracting to use and confusing to our co-authors who might not be familiar with Markdown and Pandoc. So, we extracted the yaml header and placed it in its own file: header.yaml. Note that yaml files need to be formatted based on some simple rules, so if you want to change anything, make sure you adhere to proper formatting style; a quick Google search will locate a quick tutorial if you need one.
In header.yaml, we find two commands related to referencing. One specifies the Bibtex file that contains our references the other specifies the referencing style we want to use to format our references (note that a line that starts with # is a comment and has no effect).
# References and Reference Style
csl: journal-of-neurophysiology.csl
bibliography: references.bib
citeproc: true # required in pandoc 2.14
csl stands for Citation Style Language. As stated on its website:
"Welcome to the open source Citation Style Language (CSL) project! Our goal is to facilitate scholarly publishing by automating the formatting of citations and bibliographies. We develop the Citation Style Language and maintain a crowdsourced repository with over 10,000 free CSL citation styles."
We will have more to say about references later in this article.
The next part of the header.yaml file specifies the input and output files.
# Names of Input and Output Files
input-file: manuscript.md
output-file: manuscript.pdf
These will need to be changed if you decide to rename the base Markdown file, or if you want a specific name for the outputed PDF file.
Then our header.yaml file has three difference 'include' statements. These allow us to include the content of specified files into the header, or preamble, of the LaTeX file that will generate our article, as well as before and after the actual content of our article, the stuff if manuscript.md is added to the LaTeX file. What these files contain will be described in the following sub-sections.
# Addition to LaTeX Template
include-in-header: header.tex # Change margin and line spacing
include-before-body: before_body.tex
include-after-body: after_body.tex
The next section in the header.yaml file specifies some Pandoc variables that will control various aspects of how are article is generated. In order to properly process special characters typed directly into our text editor, rather than specifying a special LaTeX command, we are using the xelatex pdf-engine. To have these special characters appear in our This font was selected as it has good support for special characters.
# LaTeX Specifications
pdf-engine: xelatex
variables:
  documentclass: article
  mainfont: "DejaVu Serif"
  sansfont: Arial
  classoption:
    - 10pt # 11pt, 12pt
The final part of header.yaml contains instructions and a commented out line related to adding numbered sections to our article.
# To have numbered sections, uncomment the following line.
# But we don't want our Title or Abstract to be numbered,
# so we will add {.unnumbered} next to our Title and Abstract
# headers, separated by one space.
# Example: # Abstract {.unnumbered}

# number-sections: true
Experimental set-up
The file called header.tex contains LaTeX commands that Pandoc will insert in the preamble of the LaTeX it generates to make our manuscript.
\usepackage[margin=3cm]{geometry}
\usepackage{lineno}
\usepackage{setspace}
\doublespacing
%\singlespacing
%\onehalfspacing
If you want to change the margins of the PDF document that is generated, you can change the value passed to the geometry packaged. Next, we instruct LaTeX to use the lineno package, which will allow us to add line numbers to our document. Finally, we load the setspace package, which gives us access to three functions that we can use to specify the line spacing we want for our manuscript. The default is double line spacing, but by commenting out \doublespacing with a % and uncommenting one of the other lines we can use single line spacing or one and a half line spacing.
Protocol
The next file we have is before_body.tex. The content of this file is inserted after the \begin{document} command in the LaTeX file, but before the actual content --the stuff in this file-- is added (by the way, I used two dashes in a row -- to get the two emdashes in this sentence).
\thispagestyle{empty}
\vspace*{2 cm}
\begin{linenumbers}
The first line tells LaTeX to not add a page number to the first page, our title page. The second line adds some vertical space, which allows the title of our article to not be at the very top of our title page. The final line tells LaTeX to start numbering the lines in our document.
If you did not want numbered lines, you could delete or comment out \begin{linenumbers} in this file, as well as \end{linenumbers} that we add to the very end of our document via the after_body.tex file.
Statistical analysis
The file after_body.tex includes a single LaTeX command: \end{linenumbers}. As mentioned above, delete or comment out this command if you do not want line numbers
Results
Effect of font on blood pressure
Many researchers love to hate referencing in manuscripts. Many people default to proprietary software like Endnote or Reference Manager, but many good quality free alternatives are available such as Mendeley, JabRef, Zotero, etc. Regardless of what reference manager program you choose, the key functionality that we want if for the program to automatically generate and update a .bib file that contains our references.
I often manually generate my .bib Bibtex files when I know they will be relatively small. However, I have recently (re)started using Zotero, and I am licking it. I can add references when I a browsing for articles, using the Zotero plugin for the Firefox web browser. I can also search for references from within the Zotero desktop application. Also, having an online accounts allows me to view and sync my library on any computer. I recommend the Better Bibtex plugin for Zotero, which adds additional functionality.
The key things is that you have a Bibtex file that contains your references. Each reference has a key, which we use to refer to the reference. Below is an example of a reference in a Bibtex file:
@Article{Diong2015,
   Author="Diong, J.  and Herbert, R. D. ",
   Title="{{I}s ankle contracture after stroke due to abnormal intermuscular force transmission?}",
   Journal="J. Appl. Biomech.",
   Year="2015",
   Volume="31",
   Pages="13--18",
}
The key of this reference is Diong2015. Therefore, I can refer to this paper by preceding it's key with the @ symbol. To include a reference to the article that will be included in parentheses, I would type [@Diong2015]; this would result in the following [@Diong2015]. If was to refer to the paper by @Diong2015 in a sentence, as I just did, I would omit the square brackets (i.e. @Diong2015). You can also include several reference keys in the square brackets. For example, typing [@Diong2012a; @Diong2012b; @Diong2015; @Diong2019] will generate [@Diong2012a; @Diong2012b; @Diong2015; @Diong2019]. Note the semi-colon and space between each reference key.
Sometimes we want to add text in the parentheses with our reference. This can be achieved by simply including the desired text before or after the reference. As an example, lets look at the following line of text: contractures are a major problem [see @Diong2015 for a review]; it looks like this when processed by Pandoc: contractures are a major problem [see @Diong2015 for a review]. More complex examples are also possible, such as [see @Huijing2003, Figure 1; also @Bojsen-Moller2010, Table 2], which results in the following [see @Huijing2003, Figure 1; also @Bojsen-Moller2010, Table 2]. Some of these styles of referencing will be depending on the referencing style you are using.
Now, if you skip to the end of this manuscript, you will find a References section where all the references I just cited will be properly formatted according to the style that I specified in the header.yaml file.
# References and Reference Style
csl: jneurophysiol.csl
bibliography: references.bib
Here we are using a Citation Style Language file that formats our references for submission to the Journal of Neurophysiology. There are literally thousands of such files available for download, or you can generate your own. That means, if your paper gets rejected from one journal and the next journal you want to submit to use a different referencing style, simply find the appropriate .csl file, add it to the project folder and change the appropriate line in your header.yaml file.
The relationship between hyphens and cholesterol
It is worth mentioning that no reference manager software is perfect. When references are downloaded from the web, the formatting is not always correct, or they may not include the abbreviated version of a journal title. Thus, it is up to the authors to ensure the content of the .bib file is correct. For example, the tile of the paper sometimes comes in title case, where each word is capitalised. This needs to be fixed in the Zotero and the .bib file updated.
Causal relationship between Markdown use and happiness
In many text editors, you can split your screen and have two documents open. Thus, you could have your paper open on one side and your .bib file open on the other. And when you want to enter a reference, you could search the .bib file for the reference and identify its key. As you probably have already realised, this is less than ideal.
A better way to work is to use the Atom editor and the autocomplete-bibtex plugin. By pointing this plugin to the .bib file that is generated and regularly updated by Zotero, we can add references without having to move our hands from the keyboard. All we have to do is type @ and start typing and a list of possible references will appear. We can scroll through the available choices or we can keep on typing to narrow down our search. The, when we have found the reference we were looking for, we simply click on Enter and the reference key is added. We can see an example of this is action in Figure 1, where I am adding this reference [@Diong2015].
Discussion
This group of files provides a relatively simple approach to drafting scientific articles. It can be adapted to suite various requirements, yet remains relatively simple and clutter-free. Because of this, it remains a simple article template and may not suite everyone's needs. In preparing this group of files, several other examples were reviewed; some were relatively simple while others were sophisticated and generated publication-quality PDF documents, some based on the official LaTeX packages provided by publishers. The benefit of this series of files is that it can easily be adapted to other types of documents, such as study notes, lab notebooks, blog posts, etc. The building blocks are simple and most key parts are explained in the present article.
Not using maketitle
Many introductory tutorials on using Markdown and Pandoc to generate nice looking PDF add the title, authors, abstract and date in the yaml header. This way, these entries are passed to LaTeX and used as part of the \maketitle command.
I tried several ways to get maketitle to generate something that would be acceptable as a manuscript title page. Using an additional LaTeX package I was able to specify more than one affiliation per author. However, allowing room to specify the details of the corresponding author and also various other items such as word count, running title, key words, etc was not straightforward. There were hacks that hijacked the date variable, but these were less than optimal. Also, I was aiming for a simple approach that did not require writing a new LaTeX template file with newly defined (or redefined) functions.
Therefore, I opted to bypass maketitle completely. This allows for great flexibility as to what appears on the title page. The downside is that I had to use several manual line breaks (i.e. \) and a call to \newpage in this, the main Markdown document.
Tables
Tables can be found at the end of the manuscript, and they are rather easy to prepare, especially if you use Pandoc-style tables (see manuscript.md for example of how to prepare tables). To add a table caption, simply allow for one empty line and start the caption with 'Table: '; this will be recognised by Pandoc as a table caption and will be properly formatted in LaTeX. To ensure LaTeX produces the table in the expected location, use \clearpage between each new table you add.
Figures
Figure are also found at the end of the manuscript and they too are easy to add to the manuscript.
{ width=10cm }
{ height=10cm }
Add the full caption to your figure in the square brackets, but unlike tables, there is no need to add 'Figure' or something similar at the start. Pandoc, via LaTeX, will automatically add 'Figure' and the appropriate figure number on the final PDF.
The figure can be located in the same folder as the Markdown file where you are drafting your article, but it can also be located in a dedicated folder, such as assets. In this case, simply include the folder name before the figure name (the forward slash may need to be backslash for Windows users).
Finally, if you did not make your figures to exact size you want them to appear in the figure published manuscript, you really should do this, you can specify the size of the figure by adding an additional entry. Note that the entry goes between curly braces, with no space between the closing parenthesis and the opening curly brace, and with spaces on either side of the size command. Various options are possible, but the most sensible for manuscripts are to specify either the width or height of the figure.
Writing with co-authors
Now comes the $1M dollar question: how to write a paper using this template with co-authors who only know Microsoft Word? Well, there are a few options.
The best way would be to have your co-authors work directly on the Markdown file (manuscript.md), where comments could be left in an agreed upon format, for example in typewriter font. In papers than do not contain references to software or code, it is uncommon to use such a font, thus it would be an easy way to leave comments |MH: I was wondering if we could expand on this point a little, maybe providing an example of what such a comment would look like|.
Also, rather than emailing the files around, the manuscript could be version controlled using git and hosted on GitHub or an internal GitLab server. With several co-authors, the person who is likely to give you the best and detailed feedback should go first, and then other co-authors could add their changes and comments after a few initial rounds between you and the other key authors (often your supervisor). It would also be possible to have each co-authors create a branch in the git repository, do their work their, and then make a pull-request. This allows for a nice, civilised conversation between the two parties. A workflow around git is definitely not common in many fields, including my own, but it makes total sense to have a lasting history of the manuscript in all its forms, and this without having dozens of files with co-author initials appended at the end or v1, v2, v3final, v3finalfinal appended at the end.
An alternative to having your co-authors use git is to email them the Markdown file and have them email back their changes and comments. You can incorporate these changes yourself on a git branch, and then merge them in to the main document. This will likely be needed for co-authors not familiar with git.
Another less-than-optimal alternative is to use Pandoc to output a Microsoft Word .docx file. While the formatting is not perfect, it is surprisingly good; definitely enough to have your co-authors revise the manuscript. But what do you do when the document is sent back to you?
We can use Pandoc to convert our document back into a Markdown file. If you co-author used tracked-changes, you have to option to accept them all or reject them all. You will likely want to accept them all and add the modified file to a dedicated git branch, where you will be able to merge these changes (accepting and rejecting the changes individually). One thing to not is that any comment you co-authors left for you as Word comments will be lost.
% Example where all changes are accepted
pandoc --from=docx manuscript.docx --track-changes=accept -o revised_manuscript.md

% Example where all changes are rejected
pandoc --from=docx manuscript.docx --track-changes=reject -o revised_manuscript.md
Another option is to accept all changes, including comments, by using --track-changes=all. This is likely not you want to do, as it actually embeds detailed notes about each change and comment made in the document. Here is an example:
If [I added stuff.]{.insertion author="Martin Heroux" date="2021-07-08T15:22:24Z"}

This means that we can now focus on the content of our manuscripts when we are writing them.
[A comment.]{.comment-start id="0" author="Martin Heroux" date="2021-07-08T15:25:08Z"}
[[]{.comment-end id="0"}]{.insertion author="Martin Heroux" date="2021-07-08T15:25:08Z"}
Workflow in Atom
If you are new to all of this and don't have a preferred writing environment, you might be curious about my current tooling. Well, as you can see in Figure 1, I use the Atom editor. This is an open-source editor that to which you can add plugins (from the folks at Atom or the Atom community). You can use Atom to do your actual coding (if you code), but you can also use it to write your papers! As you can see, I have my files and folders visible on the left side, my main manuscript.md file open in one window, a rendered PDF in another window, and, along the bottom, a command-line terminal.
When I am in the flow of writing, I don't have the PDF visible, as it is distracting. It is too tempting to compile our cool document and see what it looks like. However, when you are in the final phase of preparing your manuscript, or when you are learning Markdown and Pandoc, it can be useful to see what the PDF output looks like.
As explained above, I run pandoc -d header.yaml on the command line to generate my PDF manuscript. With the PDF viewer plugin that I use (see Table 3) for details, the PDF auto-updates.
Submitting your revised, final manuscript
While you can usually submit a single PDF document to journals when first submitting your paper, they usually want your paper in a different format, including individual, high-quality figures. Oddly enough, publishers almost all use LaTeX to typeset journals, yet many journals do not accept LaTeX files to be submitted, or simply text file or Markdown files. Rather, they prefer Microsoft Word .docx files, a complex file type that mixes formatting and content, where the formatting will be stripped away by the typesetters.
So, what to do after you have received reviewer feedback on your first submission and the editor new demands the source files? You are lucky if you are allowed to submit a LaTeX file. Then, you can use Pandoc to output a .tex file. The next easiest thing to do is to use Pandoc to convert your Markdown manuscript file into a Word file. The formatting should be good enough, but you might have to tweak your tables a little (see Figure 2 for an example). While this seems like an unnecessary and somewhat tedious step, you should only have to do it once per manuscript. And make sure you do it at the very end, when you and your colleagues have make all the required changes.
Someday, we may actually be able to provide Markdown or text files as the final product. But we should not let a journal or publisher, and their idiosyncratic choice of preferred final file, influence how we spend the vast majority of our time working on our manuscript. We will spend countless hours writing and revising our paper; I would much prefer work in a simple, clean format like Markdown for those hours, and then spend a somewhat painful 5-10 min tweaking a Word document if my manuscript has passed a first round of reviews and I have been asked to submit a revised version.
Marked-up version of your manuscript
When submitting a revised version of your manuscript, journals often ask for a marked-up version, to show the various additions and deletions that have been made. How do we do this in the current workflow?
There is a wonderful LaTeX package called latexdiff that does a great job when you have two versions of the same .tex file. A call to this program would look like this:
latexdiff manuscript.tex revised_manuscript.tex > diff.tex
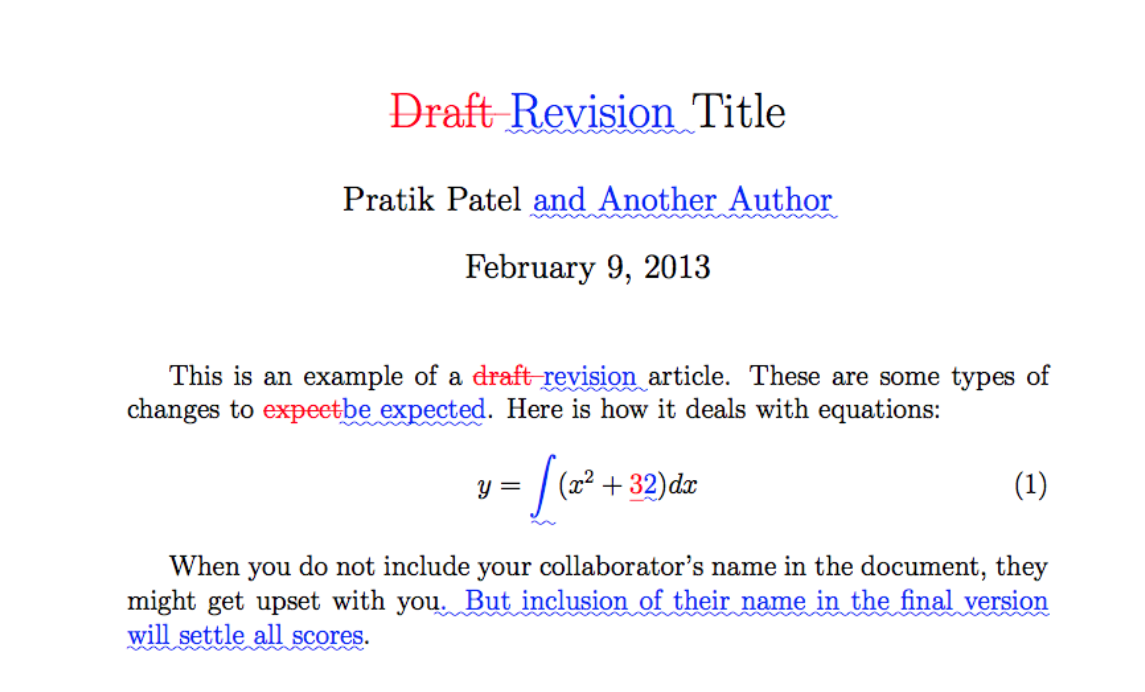
Thus, we could have Pandoc output two .tex files, one from our original submission and one from our revised version, and get the marked-up version that can be processed using pdflatex (or xelatex) to get a nice looking PDF. An example of what such a PDF document looks like is shown in Figure 3.
Another option that is in theory simpler is to use strikeout text for the things that you want to delete and bold text for any additions. This is can be achieved using basic Pandoc Markdown: ~~strikeout text for the things that you want to delete~~ and **bold text for any additions.** While this approach may seem simpler because it does not require running files through latex-diff and recompiling a PDF document, it is actually much more work. Consider a document that has been through multiple rounds of revisions by you and your co-authors, how will you know what has been added and what has been deleted? The only way for this to work is for you and your co-authors to agree on the convention to manually strikeout text using ~~text~~ and manually bold new next with **text**. It could work, but because it is not common practice, it is quite likely that someone will forget to do it. Best to learn to work with latex-diff if you ask me.
Conclusion
The approach presented here is somewhat simplistic. However, it provides a nice introduction to Pandoc and Markdown for academic writing that does not use much or any mathematical notation or formulas, or embedded code. A slightly different flavour of Markdown, called R-Markdown is popular amongst users of the R programming language. When combined with knitr, it can be used to write papers in various journal-specific styles. It can even work with Python code. However, my approach is generally to start simple and use more sophisticated tools when I need them. The current approach will do me just fine for the majority of my papers.
\newpage
Acknowledgements
I would like to thank the participants of the study, and to Dr. Honeycut for his wisdom and guidance.
Funding
The present work was supported by the two gold coins I found the other day when I was cleaning between the sofa cushions.
Author Contributions
Authors agree to attest that they have contributed sufficiently to be listed as an author.
\clearpage
Inline formatting Pandoc Markdown command Result
Bold **bold** bold
Italic *italic* italic
Superscript x^2^ x^2^
Subscript x~2~ x~2~
Emdash -- --
Table: Fundamental inline formatting in Pandoc-flavoured Markdown
\clearpage
Character name output
Degree symbol ° Greek letters β α plus-minus ± Sumamtion ∑ Trademark ™ Copyright © Money ¢ £ €
Table: Example of special characters that can be typed directly into a text editor and are properly rendered by Pandoc, without using the LaTeX math-mode or other packages.
\clearpage
Atom plugins Functionality
autocomplete-bibtex Amazing plugin that simplifies entering reference key
character-table For insert special characters
language-markdown To allow language highlighting for Markdown
pdf-view Provides in-editor PDF reviewer
platformio-ide-termial An embedded terminal window to run your Pandoc commands
tool-bar-markdown-writer Helpful when first learning Markdown and its commands
markdown-preview Provides real-time HTML rendered view of Markdown document
wordcount Wordcount of current document
markdown-fold Can fold sections, and thus focus on parts of document
Table: Atom plugins that make writing (Markdown) documents a joy.
\clearpage
 { width=16cm }
\clearpage
 { width=14cm }
\clearpage
 { width=14cm }
\clearpage