|
|
il y a 3 ans | |
|---|---|---|
| .. | ||
| README.md | il y a 3 ans | |
README.md
Set up your working environment
Exercise 1 - Git global configuration
First of all you will have to configure git locally in your desktop:
You must have git installed. See the instructions here.
Gogs
Go to https://gogs.elic.ucl.ac.be/ and "Sign-in".
Choose local and use your family name as login and your name as password.
GitHub
Go to https://github.com/ and "Sign-in".
After completing this step you will need to ask access to the repositories you want. Send an email to the administrators of this (these) project(s) asking access to.
Exercise 2 - Clone a project
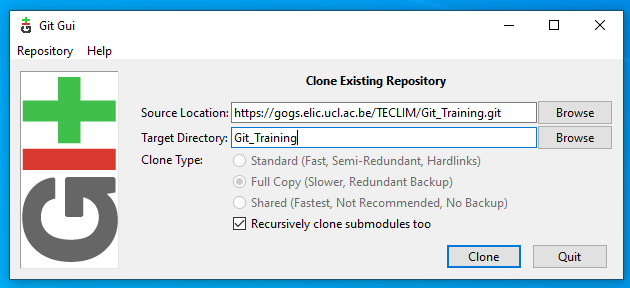
To start working you need to create a clone, called afterward “working copy” of the git_tutorial project from Github in your home (or folder of your choice):
For instance, paste the URL into git-GUI and it will clone the repo locally on your computer:
It created a 'Git_Training' folder and you can browse into it.
Git clone allows you to specify parameters such as the target folder. If you don't specify it the working copy will be named as the project.
Hidden inside a 'working copy' resulting from a git clone there is a special '.git' directory that contains internal objects needed by git.
branches  description  hooks  info  objects      refs
config    HEAD         index  logs  packed-refs
It is hidden because you are not supposed to worry at all of internals of '.git'. When you type regular git commands like those in this tutorial, git, transparently writes stuff like indices, references, branch information there.
When you are in a working copy you can use regular windows operations such as create file/folder, copy/paste, etc. Additionally you can use whatever git commands.
git status
The outputs tells you in what branch you are on. By default (if you have not specified in the clone) it clones the master branch.
On branch master
Your branch is up-to-date with 'origin/master'.
nothing to commit, working directory clean
git status is very important. It's recommendable to use it every now and then to know the status of your branch.
Moreover you can check the history of changes by using git log command.
git log
The outputs is a list of what has been changed recently, in reverse chronological order. It tells the author of the change, when it was made and the log message given.
commit eab1f5f77cc3c7041f6837ce15172f2be7a650b2
Author: Pierre-Yves Barriat <pierre-yves.barriat@uclouvain.be>
Date:   Fri Dec 4 15:19:11 2015 +0100

    Initial commit for greetings functions

commit 50920a3d04197bd4e52bbfdfdfefc56be23955c6
Author: Pierre-Yves Barriat <pierre-yves.barriat@uclouvain.be>
Date:   Thu Dec 3 19:04:16 2015 +0100

    Add readme
Exercise 3 – Basics operation
Make some changes new-file.txt
Commit your local changes to your local repository
Click with the right mouse button and click on Git Commit
You should see the following window:
In the message section, write a short summary of your commit. It is good practice to always have meaningful messages. Do not forget to add your files in the bottom part of the window.
When you are done with these steps, you can click on [Commit] and you should see the following window:
In this window, you can see how many files were changed and how many insertions and/or deletions were made. If you are satisfied with the information just click on [Push].
Push your changes to the remote repository in GitHub
In this window, you can manage to which branch you are pushing your files, but we will talk about branches later in the exercise. For now, just click on [OK] and your file will be pushed to the master branch.
Check whether your changes are online
Open your GitHub repository in your browser and click on new-file.txt. In there you should see the content, which you have written.
You can see the commit message is written in the second column of the commit you have made. You can use this column to get more information about which files were changed and what has been changed. That’s why it’s always good practice to write meaningful commit messages.


